Blog
Conversion Rate Optimization
Essential Tips for Enhancing Shopify Experience
Set up your Shopify store for success with essential configurations, integrations, and optimization strategies that create a seamless shopping experience.
Lucky Orange

Ready to launch your first e-commerce business? This Shopify store setup guide is all you need to take the right steps.
Having a business is a dream for many. Primarily because it allows everyone to achieve their most-coveted “financial freedom”. However, many are also dissuaded from pushing through with their dream businesses because of the entailed financial investments.
Most people have this notion that you must have deep pockets to launch a profitable business. You need money to make money, right? However, this has changed a lot with the advent of social media and e-commerce businesses. Nowadays, you can launch your online store with just a few hundred bucks of savings, a solid business idea, and an unshakeable entrepreneurial spirit.
With new e-commerce solutions such as Shopify, things became easier because everyone can launch their online businesses (which are way cheaper than traditional physical stores) while still working their day jobs until they can transition to full-time entrepreneurs.
And here’s the thing, you can start a Shopify store for only $1 per month for the first three months. So if that’s a good enough reason to jumpstart your online business, here’s a detailed guide for you.
Why Use Shopify?
There are several platforms available if you want to launch an e-commerce website. Some of the popular ones are WooCommerce, BigCommerce, and Wix.
However, these platforms have their drawbacks. WooCommerce isn’t a standalone solution. Instead, it is a simple plugin that is used alongside a CMS platform such as WordPress.
Wix is a viable e-commerce website builder which has a huge collection of apps in its ecosystem. Its main flaw lies in its lack of flexibility in that you cannot change your theme once you’ve launched your online store.
BigCommerce, on the other hand, is a rising e-commerce website builder that boasts of in-built integrations. Its main drawback is that there are very few apps built around it primarily because it has a small user base at the moment.
Shopify emerges as the better solution compared to all these e-commerce platforms if you want:
A standalone solution that has a CMS and e-commerce store included
Flexibility in terms of design and functionality
To build an online store with confidence knowing that there are integrations available should the need arise.
Here are more reasons why Shopify is a great platform for your own online store.
Low Startup Cost
Yes, it’s true. You can launch an e-commerce website with Shopify starting at just $1 per month for the first three months, regardless of the subscription plan that you choose (except for the Plus plan).
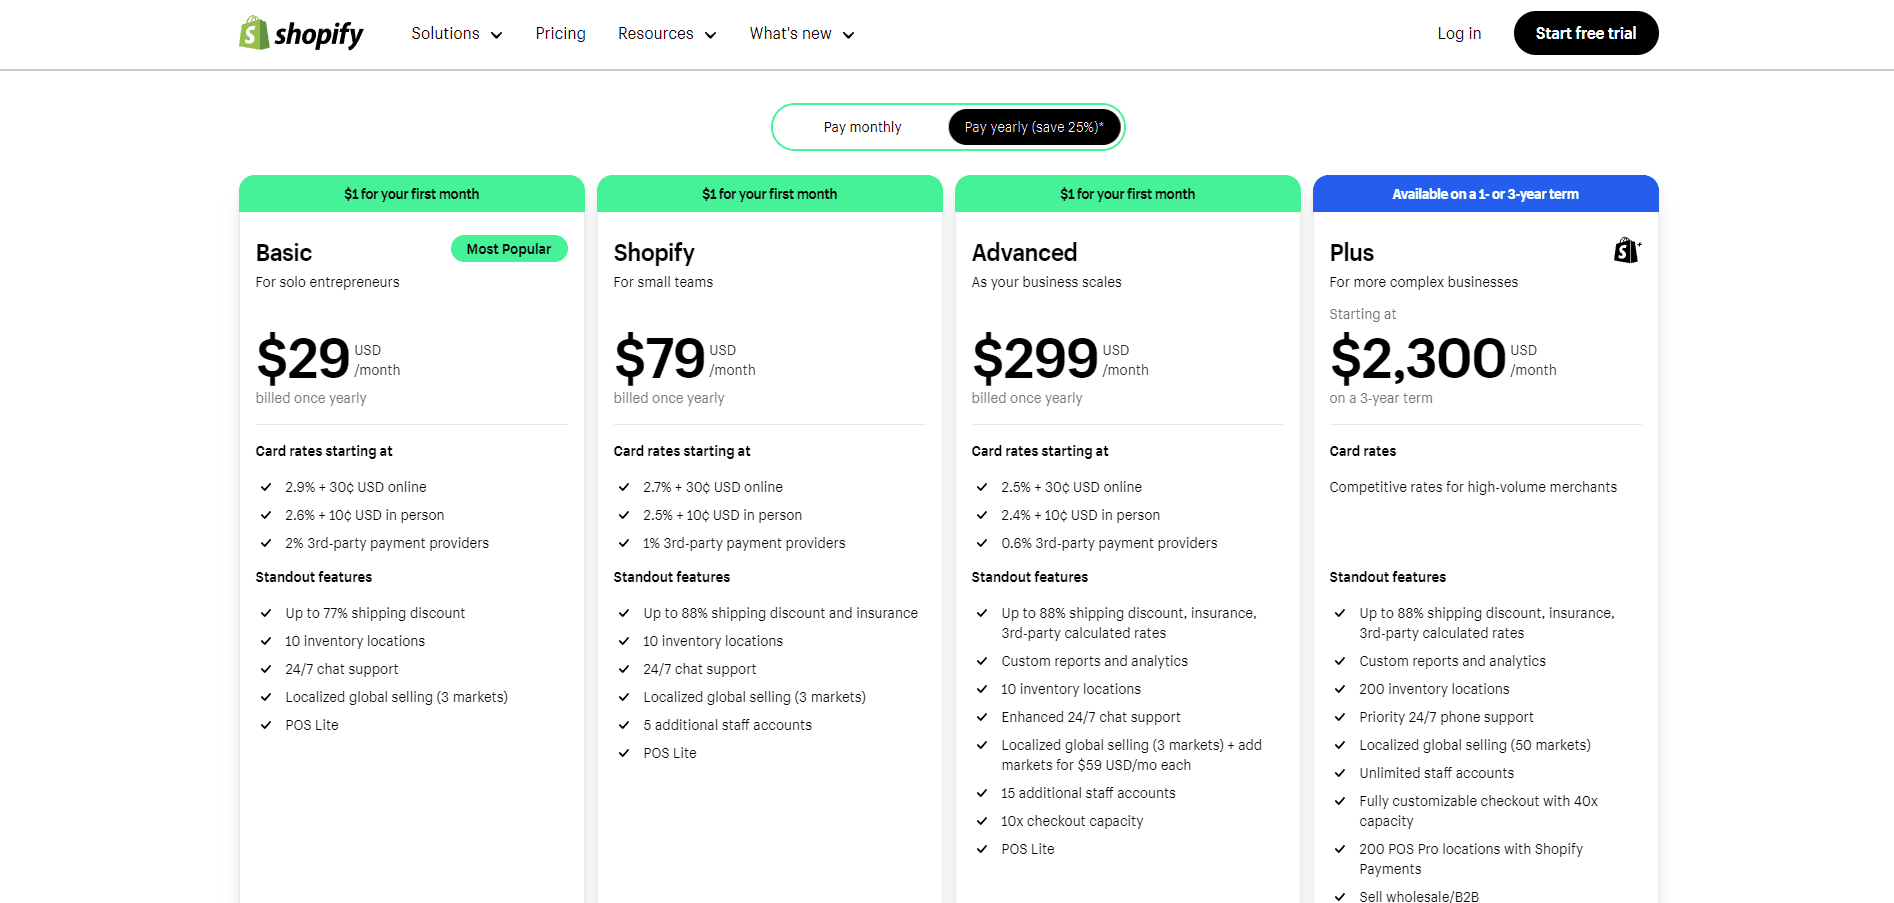
Image source: Shopify
Thus, you have three months to set up and figure everything out if you are new to Shopify. This also means that the startup cost of launching an online store on this platform is very low and that there will be no pressure to make money right off the bat.
Note: Aside from your monthly subscription, the platform also charges small Shopify transaction fees for every successful sale.
Shopify App Store Has Everything You Need
In his recent (May 23, 2024) post in his LinkedIn page, Harley mentioned that Shopify currently has 12,000+ apps in the Shopify app store. As such, Shopify is the only e-commerce platform that has this many collections of apps built around it.
This presents a lot of benefits to Shopify store owners like you because you no longer have to search for apps outside of Shopify in order to find a solution to your problem. Shopify is also very stringent in approving apps that are listed on its platform, so you can rest assured that there will be no compatibility issues whatsoever.
Free Themes For Beginners
Another thing that contributes to the low startup cost of a Shopify store is that there are a number of free and fully functional themes available for all users.
Aside from that, the Shopify Help Center provides comprehensive documentation of everything that you need to know on all aspects of launching an online store.
Finally, the Shopify Community forum allows merchants to connect and help one another regarding any issues that they face.
Lots Of Shopify Experts Online
Because Shopify has 2.3 million plus users (source: Store Leads), the demand for expert developers, designers, and other skills is very high.
As such, you can find global agencies specializing in Shopify development as well as individuals such as freelancers who can do various types of services.
The best place to look for Shopify development services is the Partners directory.

Here, you can find 2000+ Shopify partners to do all kinds of services for you.
Tons Of Learning Resources
Shopify’s popularity has attracted a lot of solutions and businesses built around it. As such, you can find tons of learning materials from Shopify itself as well as from other e-commerce content creators who are focused on Shopify.
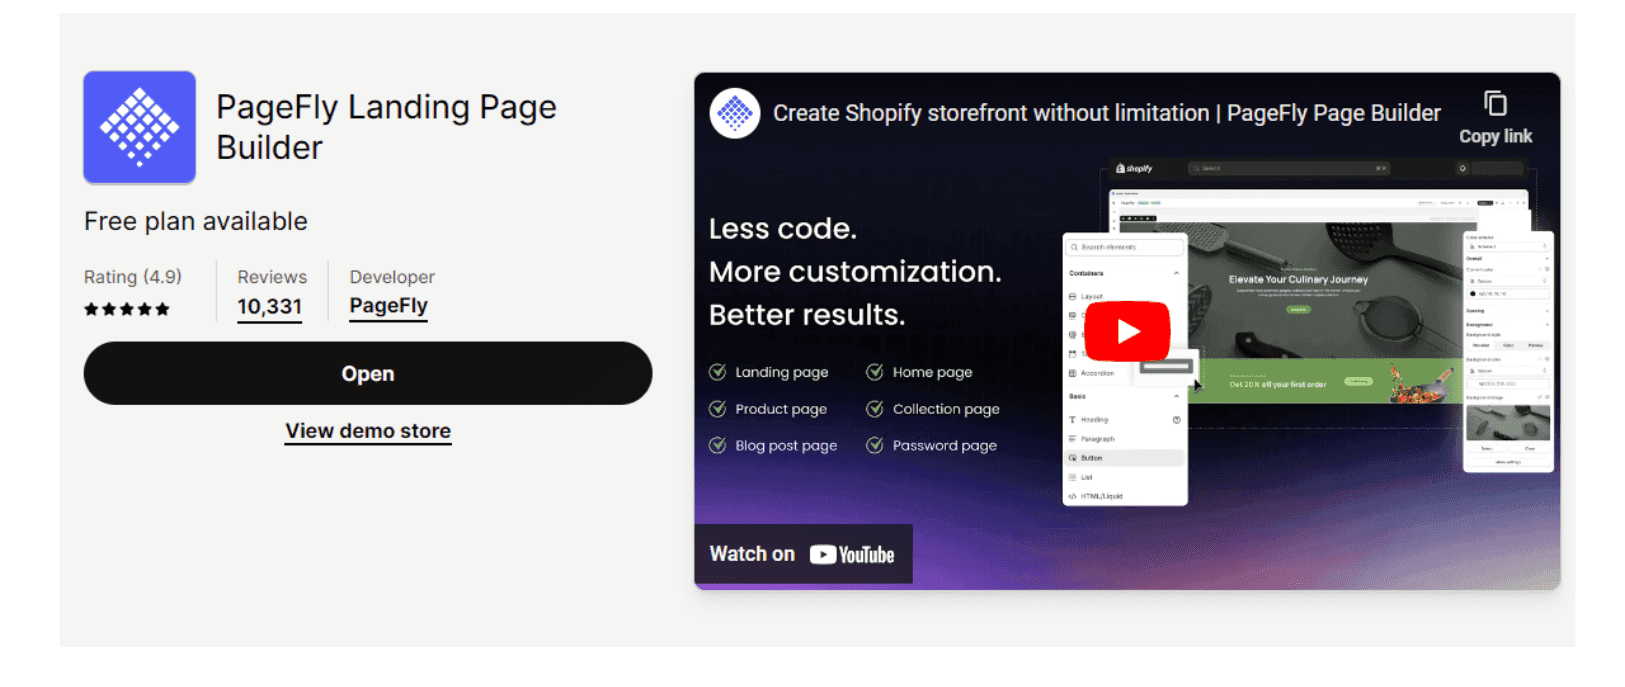
PageFly is the leading landing page builder for Shopify. But aside from its Shopify app, PageFly also publishes several blogs per month.
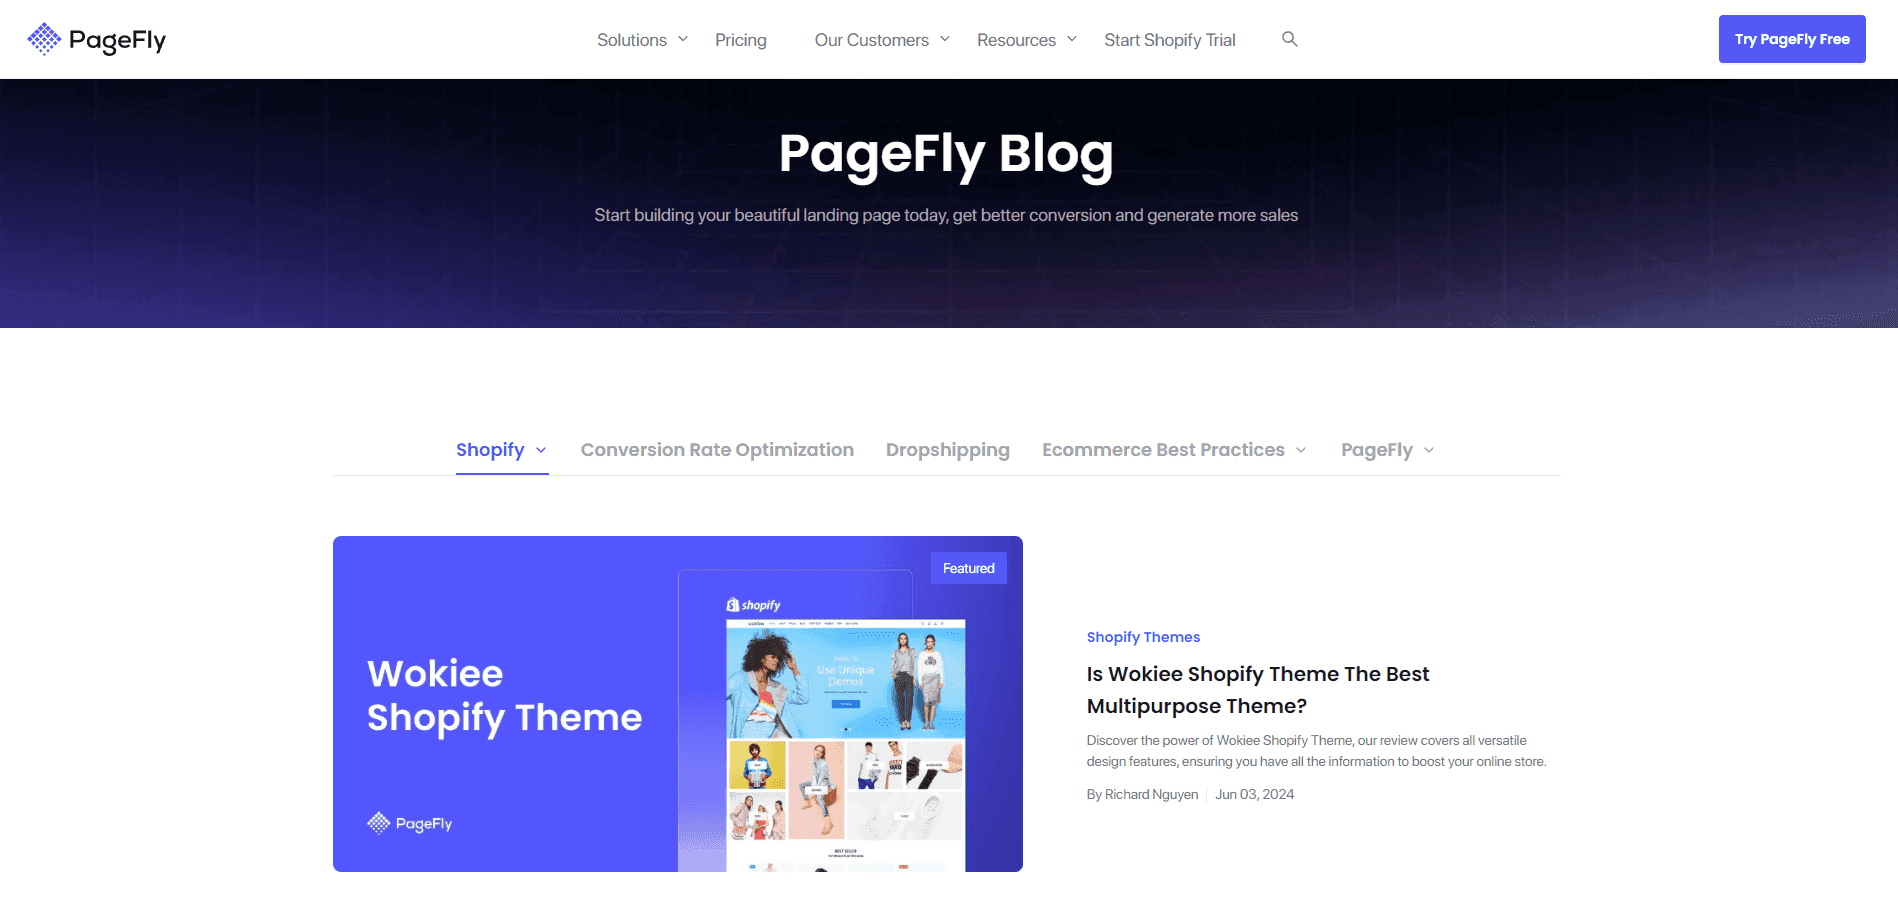
Source: PageFly
These blogs tackle topics such as e-commerce tips, marketing tips, honest reviews, as well as technical guides for all types of Shopify store owners.
Bi-Yearly Major Updates
The world of e-commerce is continuously evolving. As such, ecommerce platforms like Shopify have to evolve too. In 2022, Shopify introduced the Shopify Editions.
These are bi-yearly major updates to the platform that aim to progressively improve the capabilities of Shopify to empower not just online store owners, but also Shopify partners and developers.
The latest update for this year is the Shopify Editions Winter 2024 which introduced 100+ new updates to the platform. The Shopify Editions Summer 2024 is expected to be released in the second half of this year.
There’s a lot more to like with Shopify. Read this Shopify review to learn more.
How To Set Up A Shopify Store?
Shopify is proven to be a very capable e-commerce platform. But aside from the compelling features that it packs, Shopify is also loved by many primarily because of its ease of use.
In fact, you can set up a functional Shopify store in an hour or less. But realistically speaking, you would want to spend as much time as you need to make sure that everything works properly.
Here is our 12-step Shopify setup checklist (with video tutorials) to help launch your online store.
01. Sign Up With Shopify
First thing in our Shopify setup checklist, you need to sign up with Shopify. After signing up, you’ll be redirected to this page:
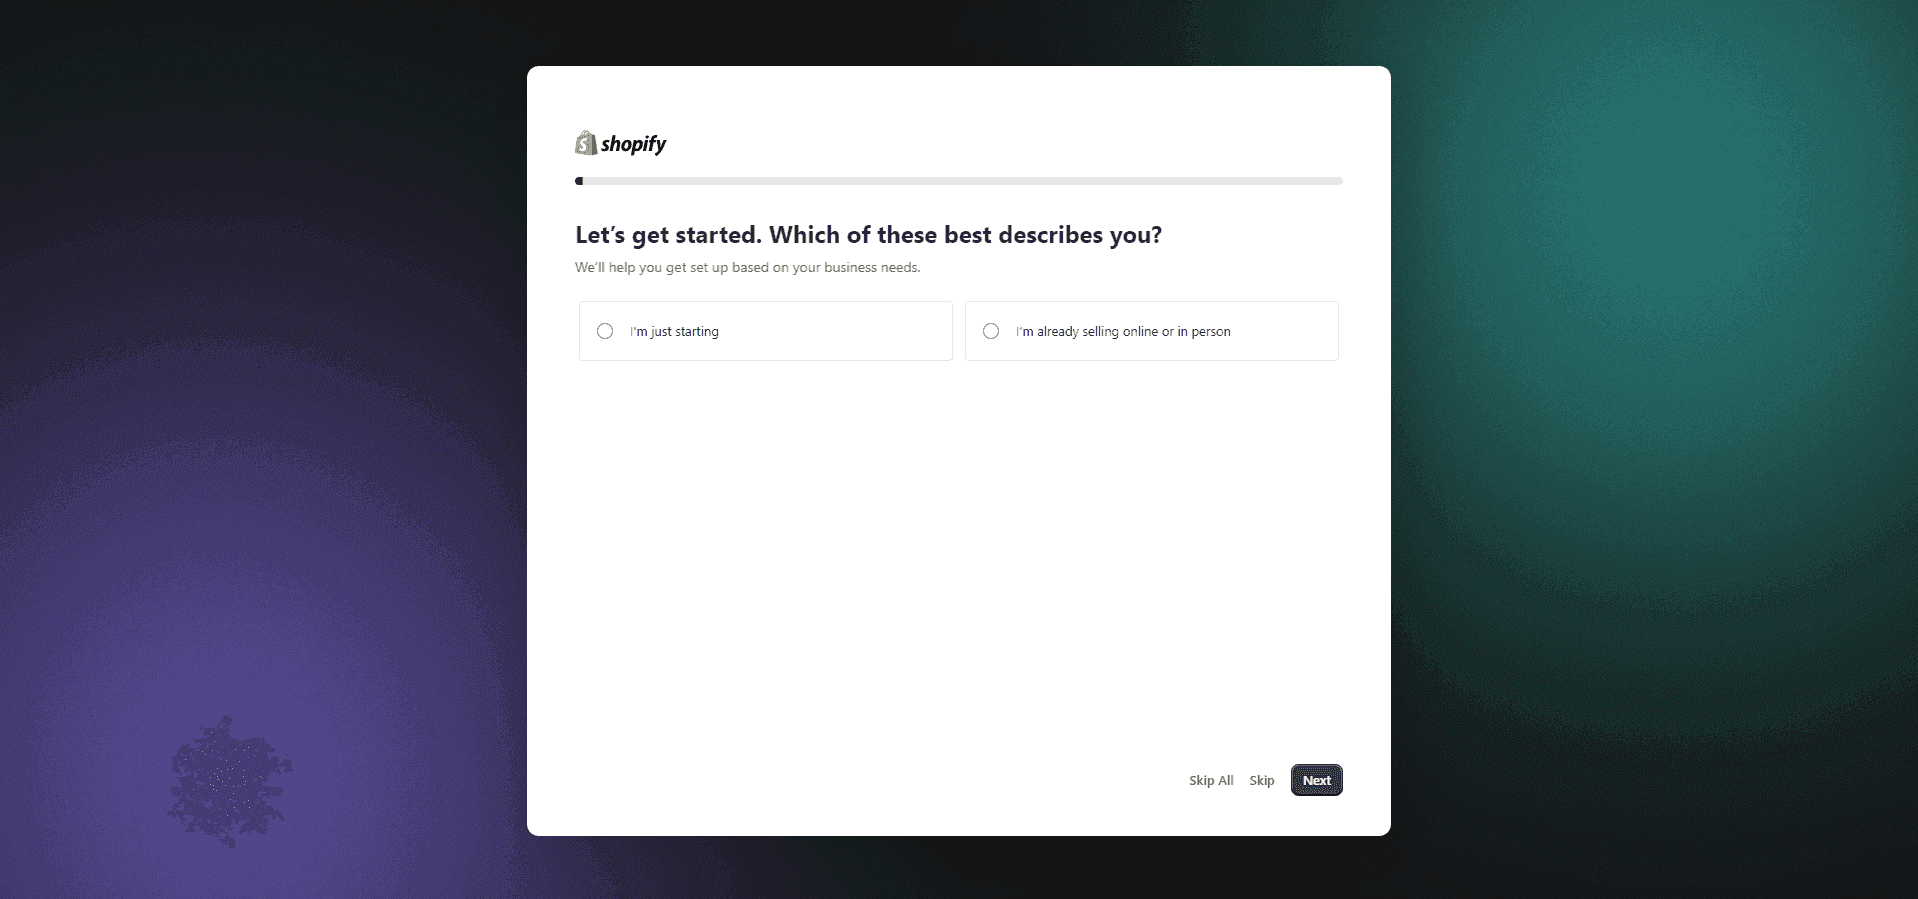
Step 1: Choose the options that apply to you and click Next until you finish the onboarding process. You can also click Skip All to skip this step if you still aren’t certain about the specifics of your business. You can always fill this out later.
Step 2: After that, you’ll be asked, “Where will your business be located?” Make sure to input your correct location, otherwise, Shopify will detect this and your account could be disabled. Make sure that you input your correct country as Shopify might disable your account if you didn’t select the right information.
Step 3: Choose a login option. Customarily, we use our Google accounts in signing up for a Shopify account in order to make things easier later on as this will be where important notifications will be sent.
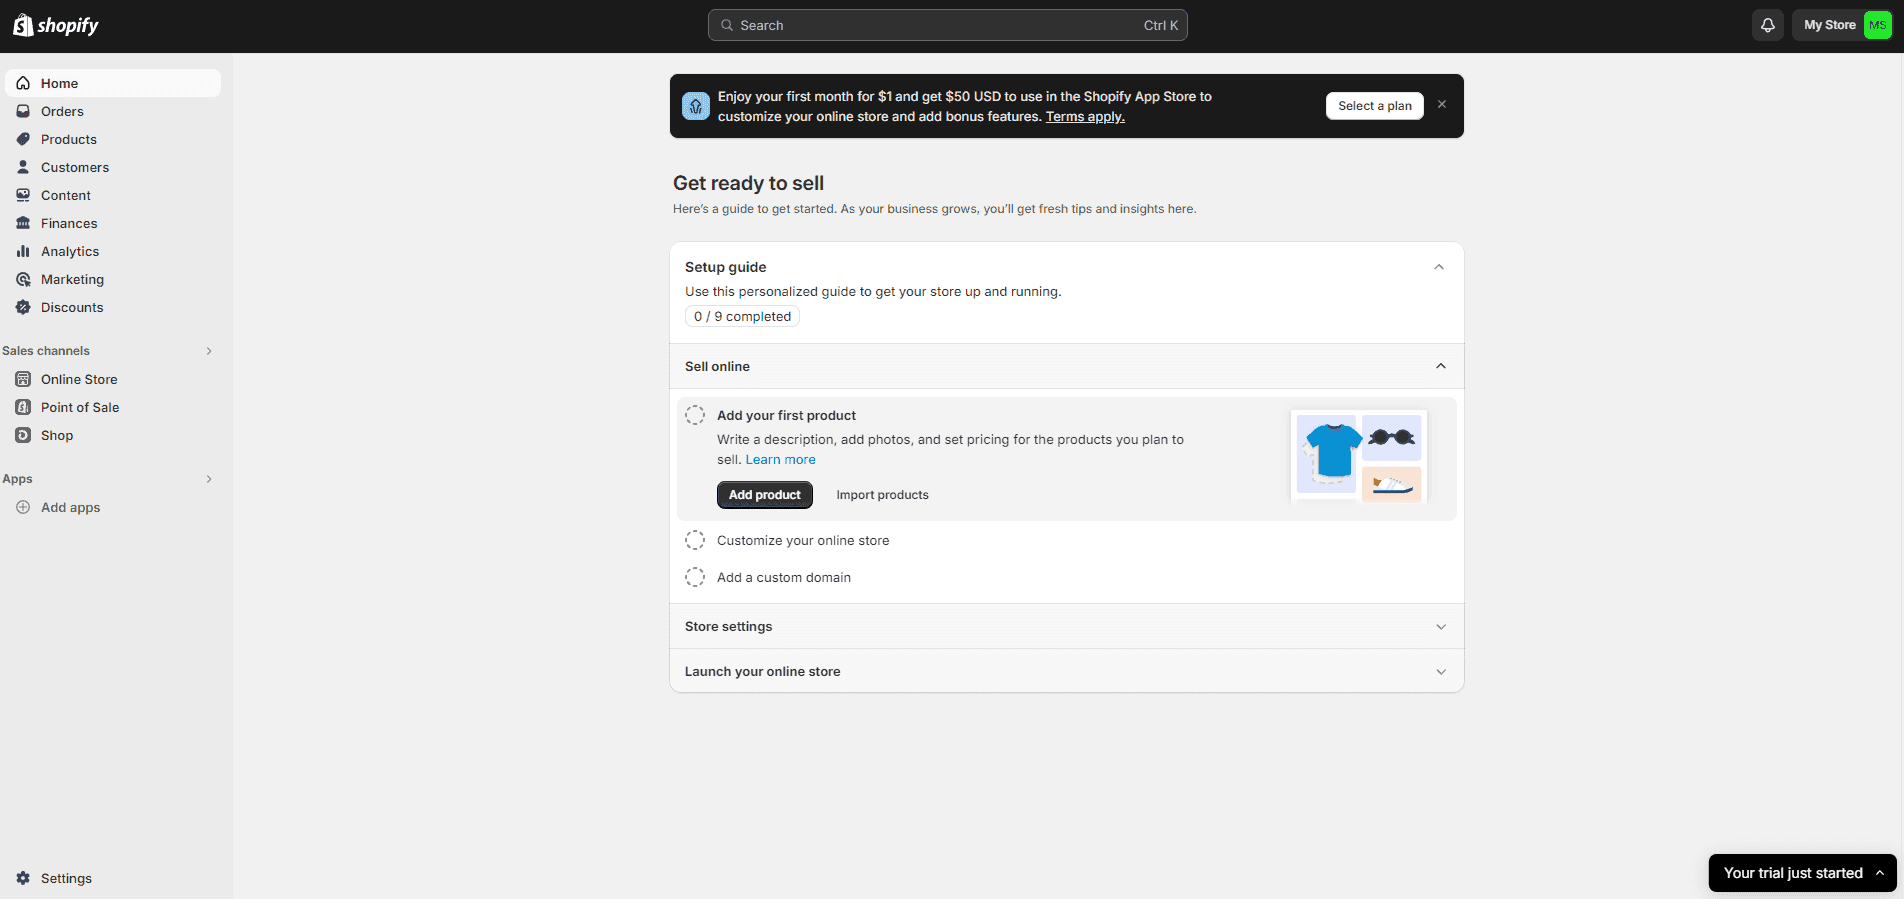
After going through these steps, your Shopify account will then be created and you will be redirected to the admin page of your online store.
You don’t have to select a plan yet if you just want to explore Shopify as it has a 3-day free trial. But since you want to launch an online store already, we recommend subscribing to a plan right at the beginning.
As we mentioned, Shopify offers the first three months for only $1 per month regardless of subscription. So there’s very little risk and you’ll have a lot of time putting your store together.
02. Connect Your Custom Domain
A custom domain is important to have if you want your website URL to be named after your business. If you choose not to purchase a domain, your online store will have a “yourstore.myshopify.com” domain name, which won’t look good as it is not personalized.
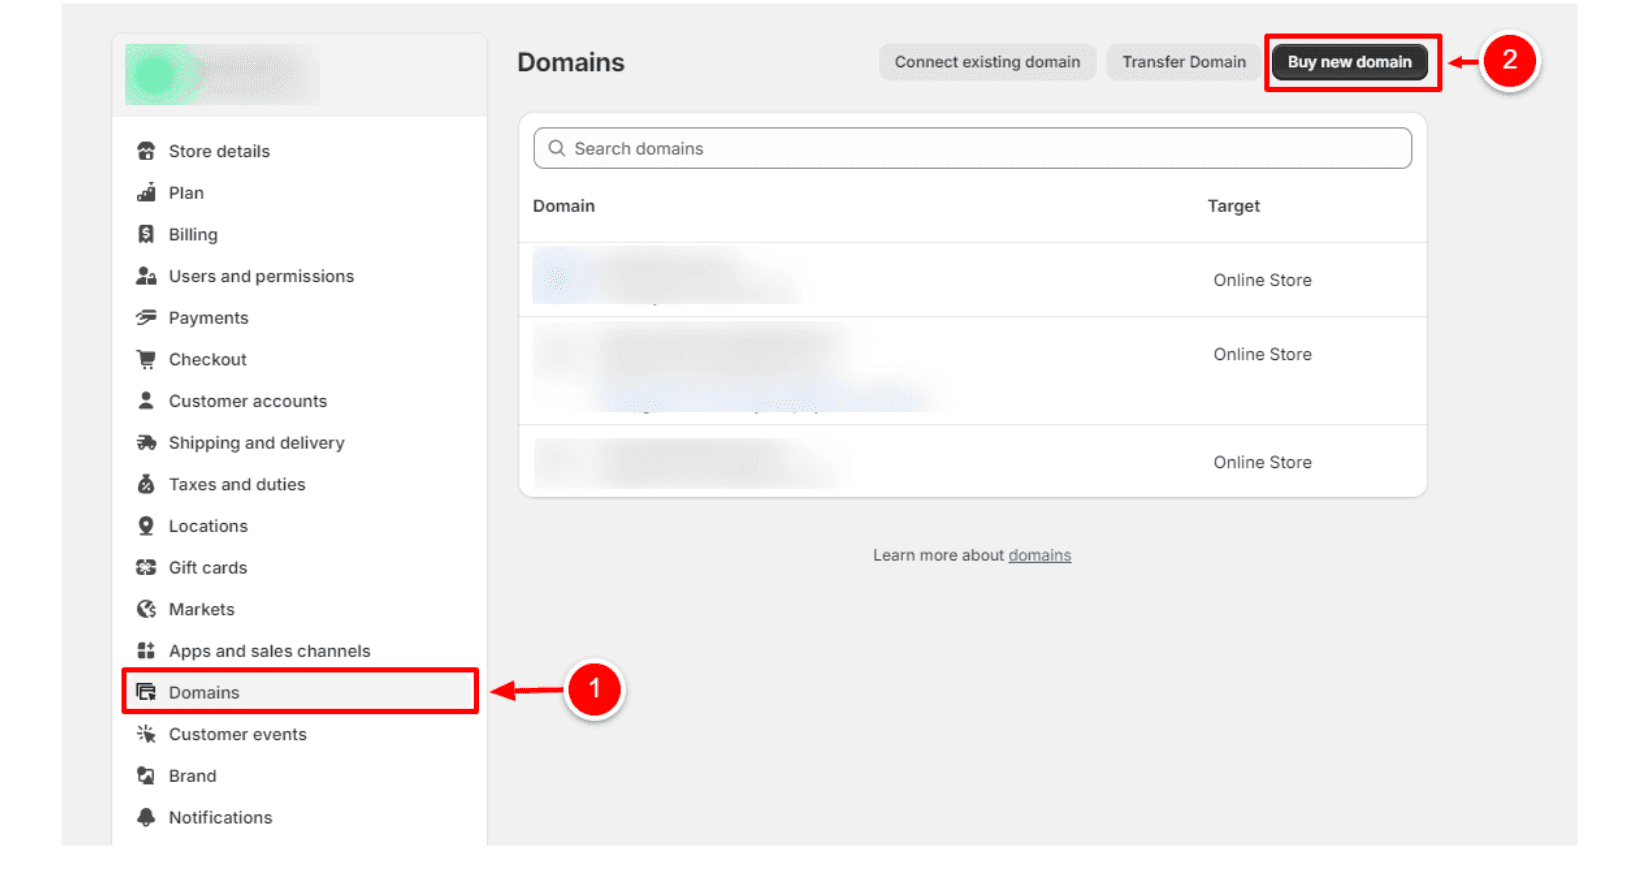
To buy a custom domain or to connect an existing one, click Settings on the lower left corner of your admin page. In the settings menu, click Domain. Assuming that you don’t have a custom domain yet, click Buy Domain.
In the corresponding search field, input the domain name that you want. For example, [yourstorename].com.
If the .com TLD for your custom domain name is not available, you can use other TLDs such as .shop, .store, .net, etc. This can happen especially if you are using a common English word for the name of your Shopify store.
Try some variations of your store name until you find an available domain for you. It is worth noting that prices of domain names on Shopify vary. Upon purchasing one, you can use it for an entire year and you have to pay every year after that to continue using it.
03. Familiarize Yourself With The Admin
The Shopify admin is your main dashboard in managing your online store. As you click a menu button at the left pane, your dashboard will show its corresponding content on the main screen.

Home
Shows notifications or new activities on your store
Orders
Shows order fulfillment progress on each of your products. From this menu, you can create custom orders and you can track abandoned checkouts.
Products
Shows all the products in your online store including those that are not yet published. From this menu, you can also create new collections, track your inventory, order from suppliers, transfer inventories to other locations, and create custom gift cards.
Customers
Shows a complete list of all your customers. You can create new customer segments in this menu in order to classify them according to your parameters. This will help you in your future marketing efforts.
Content
Shows all the marketing assets in your store including product images. You can create custom content definitions in this menu in order to streamline content creation with metaobjects.
Analytics
Shows all the reporting tools offered in your Shopify store. You can track everything in your online store here – from sales, website traffic, conversion rates, and more.
Marketing
Shows all your active marketing campaigns as well as their efficacy through analytics. You can create automated marketing campaigns from here by integrating third-party apps or by using in-built Shopify marketing templates.
Discounts
Shows all the existing discounts on your online store. This is also where you create them.
Sales Channels
Under Sales Channels, the Online Store is the primary one in your e-commerce journey. This will serve as your portal to the theme editor where you can customize your store. We’ll talk about the theme editor in the next section. From here, you can also publish new blog posts, create new pages, customize your website navigation, and adjust your preferences. As you add other sales channels such as Shopify POS, they will also appear here.
Apps
Gives you a list of all the apps that are installed on your Shopify store. By clicking this, you can also search for other apps in the Shopify app store. Alternatively, you can use the Search bar at the top of the page to search for anything in your online store.
Settings
Finally, the settings, as we discussed, will redirect you to the Settings page where you can access options such as your subscription plan, billing, payment gateway, taxes, and more.
The Importance of Two-Step Authentication for Your Online Store
In the world of e-commerce, securing your store is paramount, and two-step authentication plays a vital role in this. This feature adds an extra layer of security beyond your standard password, which is crucial for protecting sensitive data.
Enhanced Account Security
Two-step authentication significantly bolsters your account security. After entering your password, you'll need to provide a unique, one-time code sent to your mobile device. This means even if a hacker gets hold of your password, they cannot access your account without this secondary code.
Reducing the Risk of Unauthorized Access
This additional security measure makes it immensely difficult for unauthorized users to breach your account. By relying on a code generated through your device, you're essentially adding a personalized lock that is difficult to duplicate or forge.
Preparing for Contingencies
Security doesn't stop at just setting up two-step authentication. It's essential to prepare for scenarios where your phone might be lost or stolen. Therefore, always make sure to keep your recovery codes in a secure place. These backup codes are your safety net, allowing you access to your store even if your primary device is unavailable.
By integrating two-step authentication, store owners can significantly minimize the risk of unauthorized access, ensuring that their business and customers remain secure. This proactive step offers peace of mind and a robust barrier against potential cyber threats.
How to Change Your Shopify Store's Name
Changing your Shopify store's name is straightforward, and you can do it directly from your store's settings. Here’s a step-by-step guide to help you with the process.
Step 1: Access Your Store Settings
Log in to your Shopify account.
Navigate to the Home page of your admin dashboard.
On the lower left-hand side, click on Settings.
Step 2: Modify the Store Name
In the Settings menu, select General.
Locate the “Store name” field. Delete the old name and type in your new desired store name.
Once you’re satisfied with the change, make sure to Save your updates.
What About the Shopify Domain Name?
When you initially set up a Shopify store, it automatically comes with a default "myshopify.com" URL. Unfortunately, this specific Shopify domain cannot be altered. However, there’s a simple solution to give your online presence a professional edge.
Opt for a Custom Domain Name
Visit your Shopify dashboard and head back to Settings.
Choose Domains and click on Buy new domain.
Here, you can purchase a custom domain like "yourstore.com" directly from Shopify for around $13 per year. This setup allows you to choose an address that aligns with your brand identity.
Why Consider a Custom Domain?
Professional Appearance: A bespoke domain elevates your store's professionalism, instilling confidence in your customers.
Brand Consistency: It helps maintain consistency with marketing materials, making your store easily recognizable.
Better Memorability: Custom domains are often shorter and more memorable, increasing direct traffic to your site.
While you could hire a service to assist with these updates, the process is intuitive enough to manage independently. A small investment in a custom domain name is a strategic move that can significantly enhance your online branding and customer trust.
04. Choose A Theme
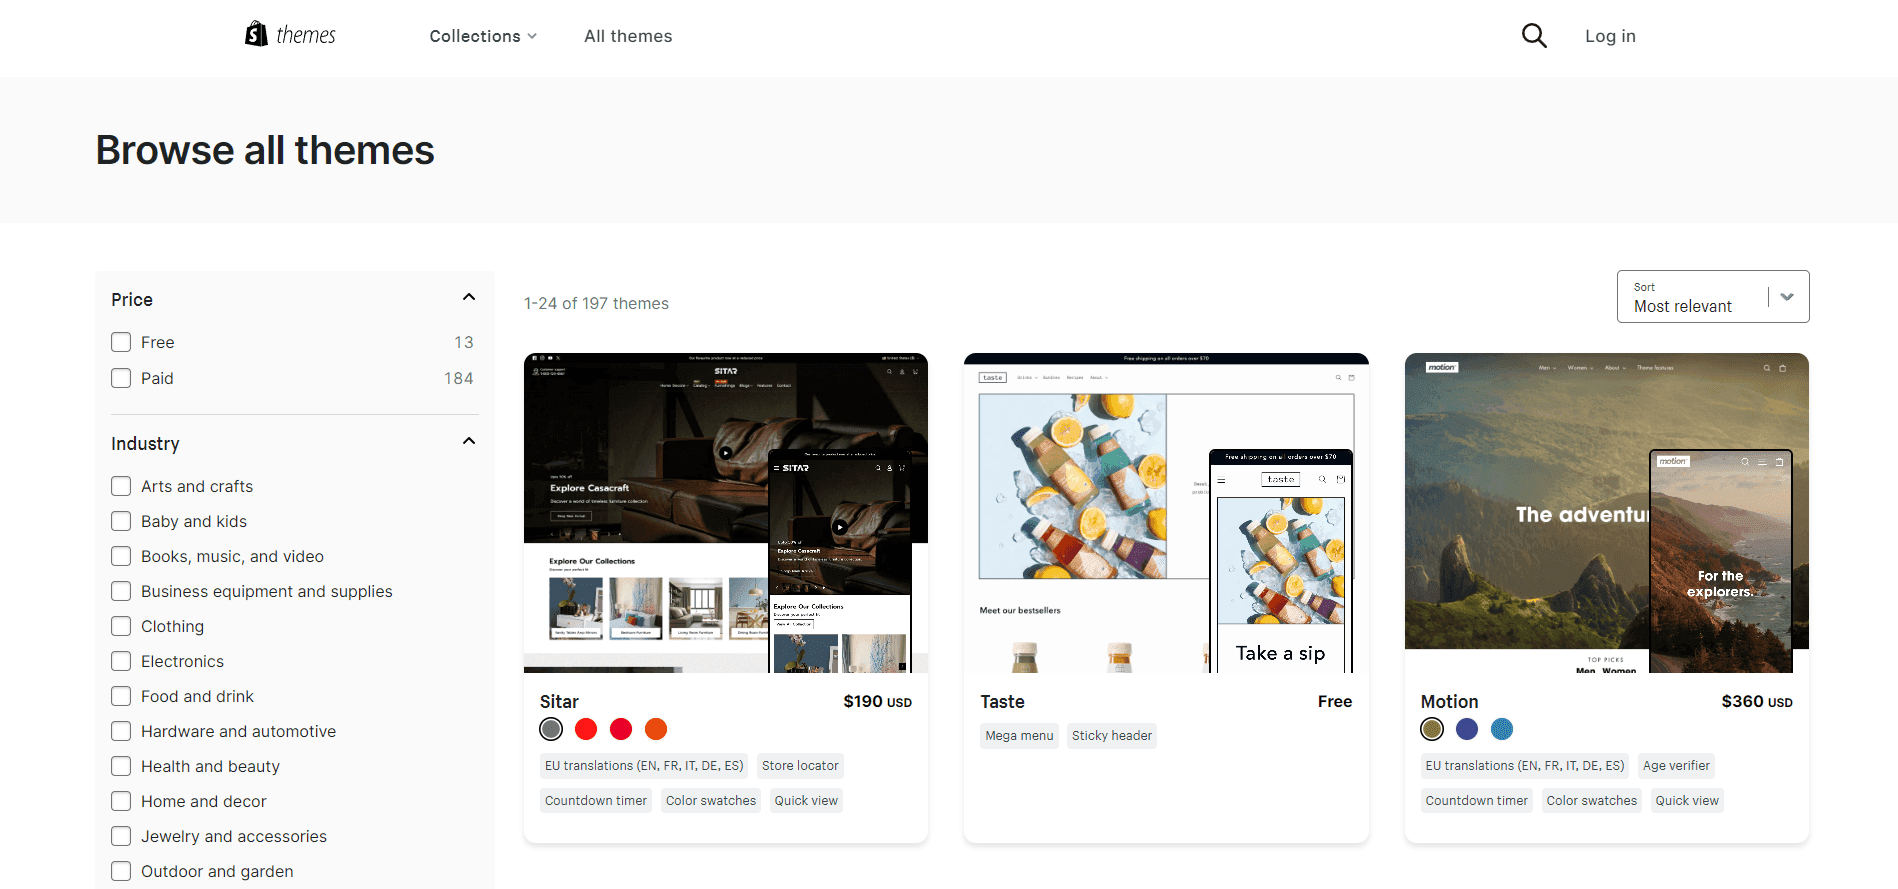
To give your store a unique appearance, choose a theme that suits your taste. Simply go to the Shopify theme store and choose the one that you like.
By default, all new Shopify stores come pre-installed with the free Dawn theme. But if you don’t like the Dawn theme, you can choose from the other 12 free themes offered in the theme store. If you want more features, you can also opt for paid themes. There are 180+ paid themes to choose from for your online store. Thus, you won’t run out of options.
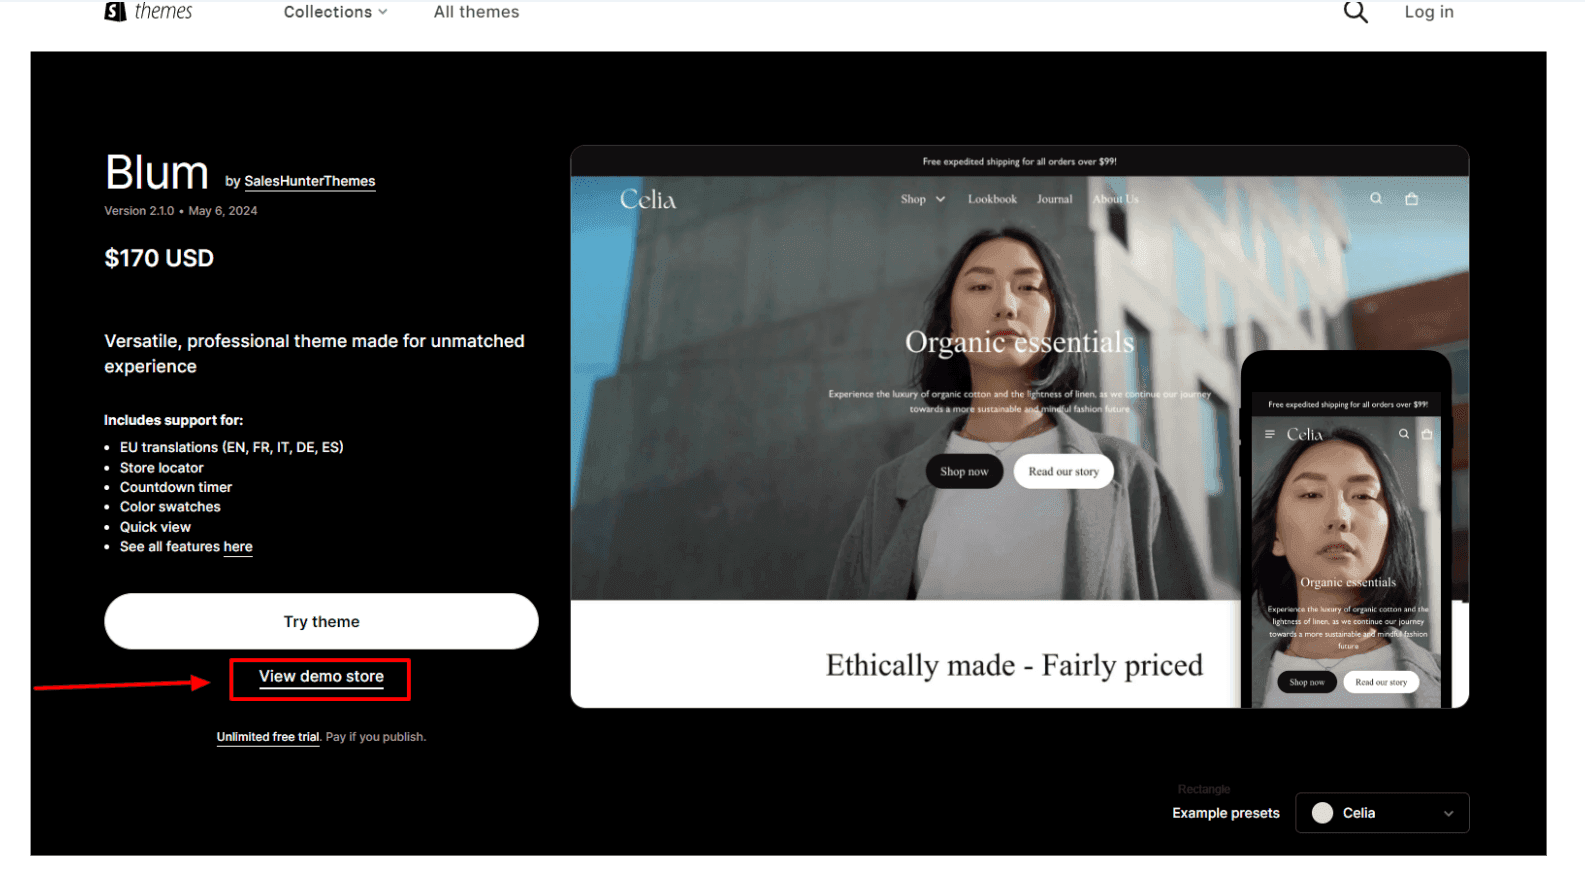
In choosing a theme, make sure to take your time in exploring all its unique features. You can also click the View Demo Store button to see how a theme looks in the real world.
The good thing about Shopify is that you can try as many themes as you like. You can even customize them to your liking without paying for them. You only have to pay for a theme once you publish it to your online store.
05. Familiarize Yourself With The Theme Editor
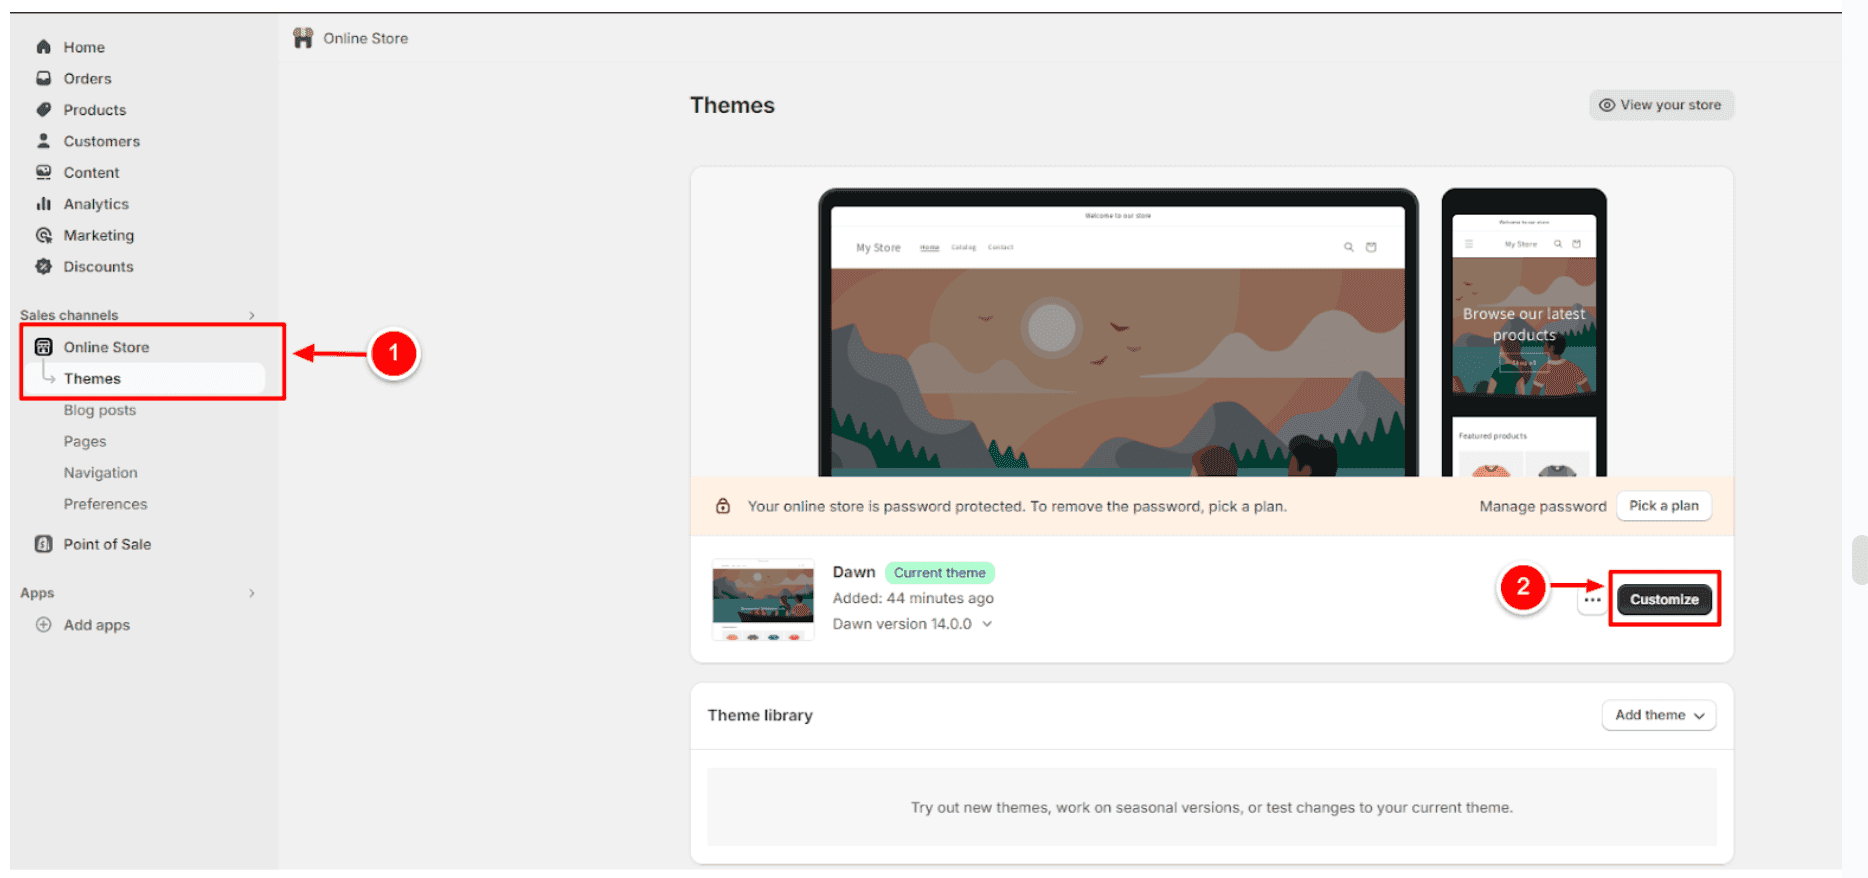
The theme editor is where you modify the appearance and other functions of your store. To open the theme editor, click Online Store, select Themes, and click Customize.
After that, you will be redirected to Shopify’s theme editor. Take note that the theme editor’s look and structure will differ depending on the theme that you are using. However, the dynamics of using it will remain the same.
We numbered the basic parts of the theme editor for easier understanding:
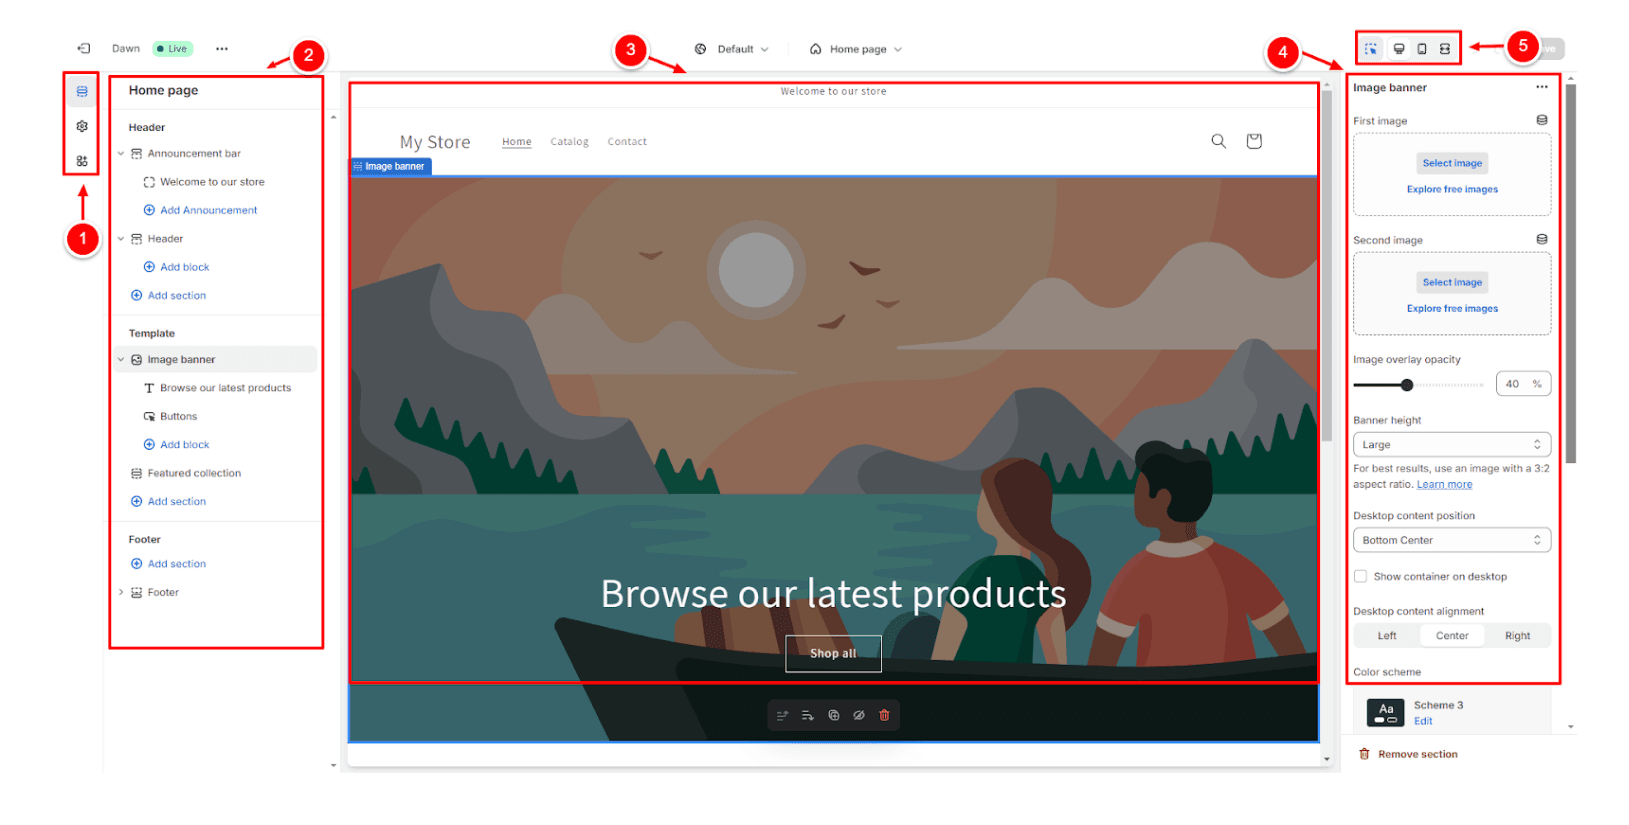
01. Sections, Theme Settings, and App Embeds
These menu buttons show which portion of the theme editor you’re in. The picture above shows that we are in the Sections menu viewing the home page structure of your online store.
Below the Sections menu is the Theme Settings menu. This is where you adjust other important elements of your online store such as typography, logos, colors, layouts, and more.
The bottom-most menu is the App Embeds. This one shows the currently installed apps in your store that affect its functionality and appearance. As you install apps in the future, you might be required to go to this menu to toggle them on so they can start integrating with your store.
02. Page Structure
The page structure shows the hierarchy of sections in the current page of your online store. The information shown in this pane will differ depending on the page that you are viewing. To go to a different page on your website and to view its current structure, click the menu button on the main screen (number 3).
03. Page Preview
The page preview shows what a specific page on your website currently looks like. As you drag and drop sections to change their hierarchies in Number 2, the appearance of the page preview will also be altered. This will be your main visual reference in customizing your website.
04. Page Settings
The page settings is where you can find more customizable page elements. On the home page, you can change your hero image, choose a main color scheme, and more. Just like page structure, the information shown on this pane will differ depending on the page that you are currently viewing.
05. Device Type
Finally, the device type portion of your theme editor shows the appearance of your website depending on the device type that you chose. The image above shows the website's appearance on the desktop. However, you can also choose between mobile and fullscreen to see how your website truly appears. Although all Shopify themes are mobile responsive, we highly recommend double-checking your website’s appearance on mobile devices.
Take your time in learning the different aspects of the theme editor and you’ll have a smoother experience in customizing your Shopify store.
Read: Editing your theme
06. Add The Essential Pages
Now that you’re familiar with the theme editor, you can add new pages to your store in order to put more useful content in it.
To add a new page to your Shopify store, click Online Store in your store admin, select Pages, and then Add Page.
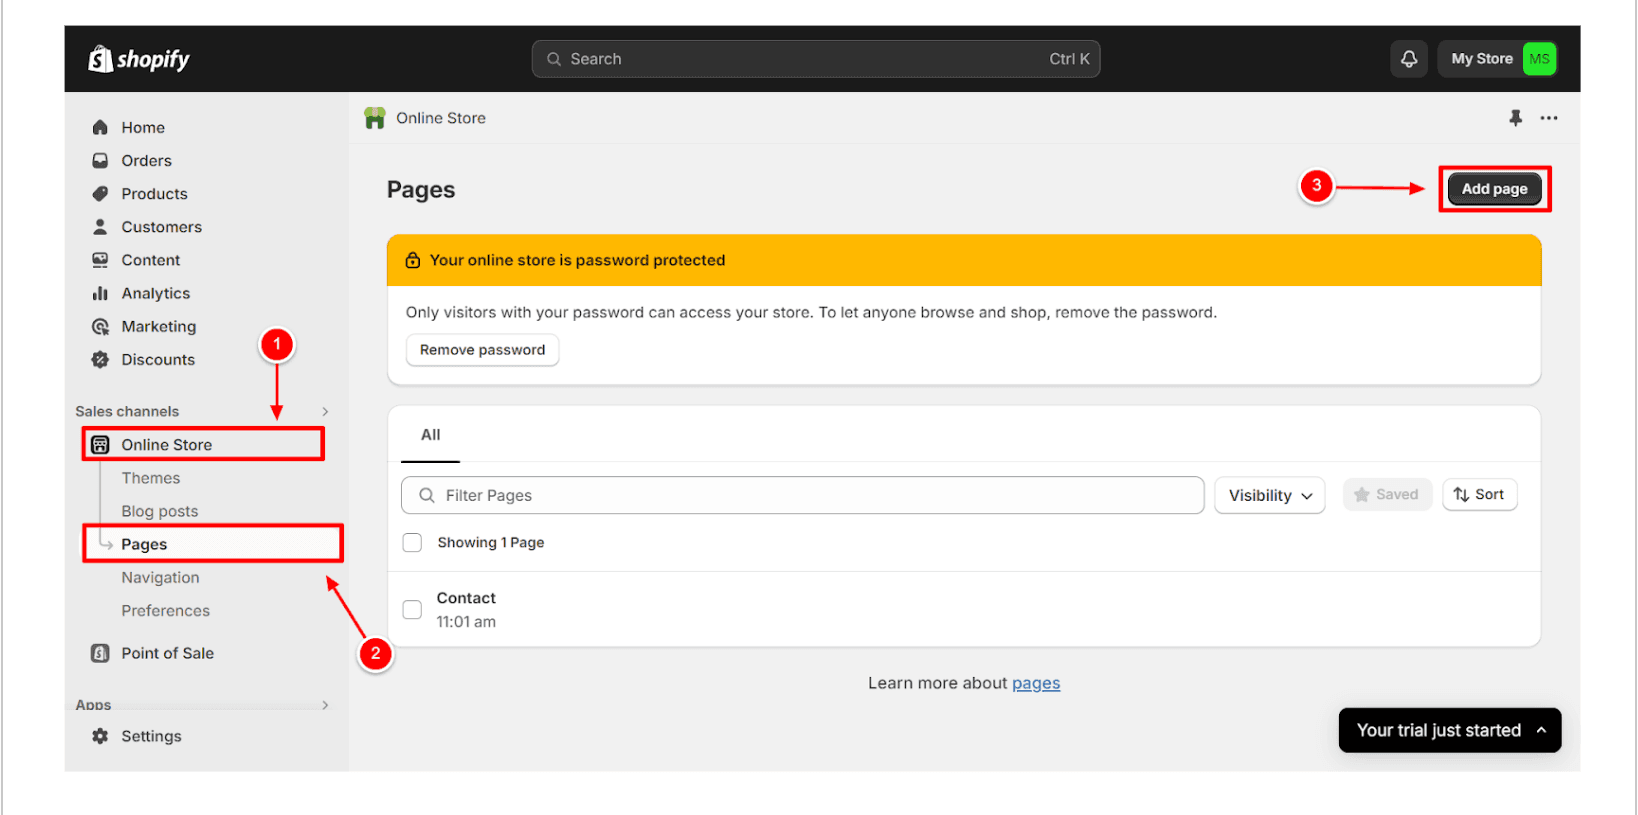
Some of the essential pages that you need to have in your website are:
Home page
About page
Contact page
Privacy policy
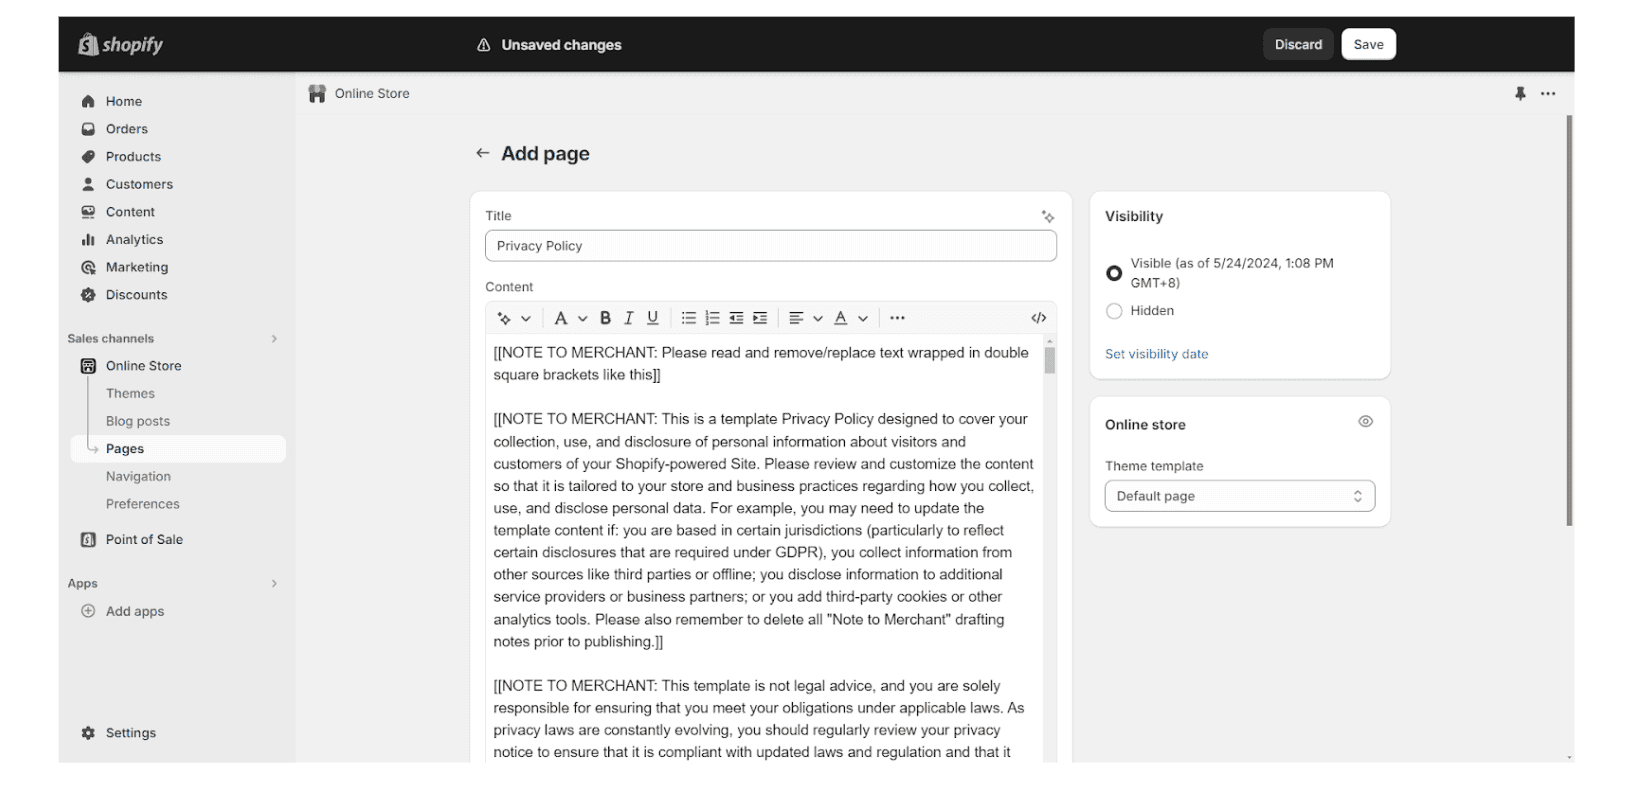
After creating a page, click Save and it will be published in your online store.
07. Add Your First Products
After creating all the necessary pages as mentioned above, you can now add your products to your store. The process of adding products in your store might differ depending on your business model.
If you have a dropshipping Shopify store, products could be automatically added to your store when you import them from your drop-shipping supplier. The process will also be different if you are selling digital products from your store.
Assuming that you will be selling physical products, watch this detailed video tutorial to add new products to your online store:
Whenever adding new products to your store, it is worth noting that product descriptions should be well thought out to give a clear explanation of your product.
Below the product creation page, you will find a Search engine listing section.
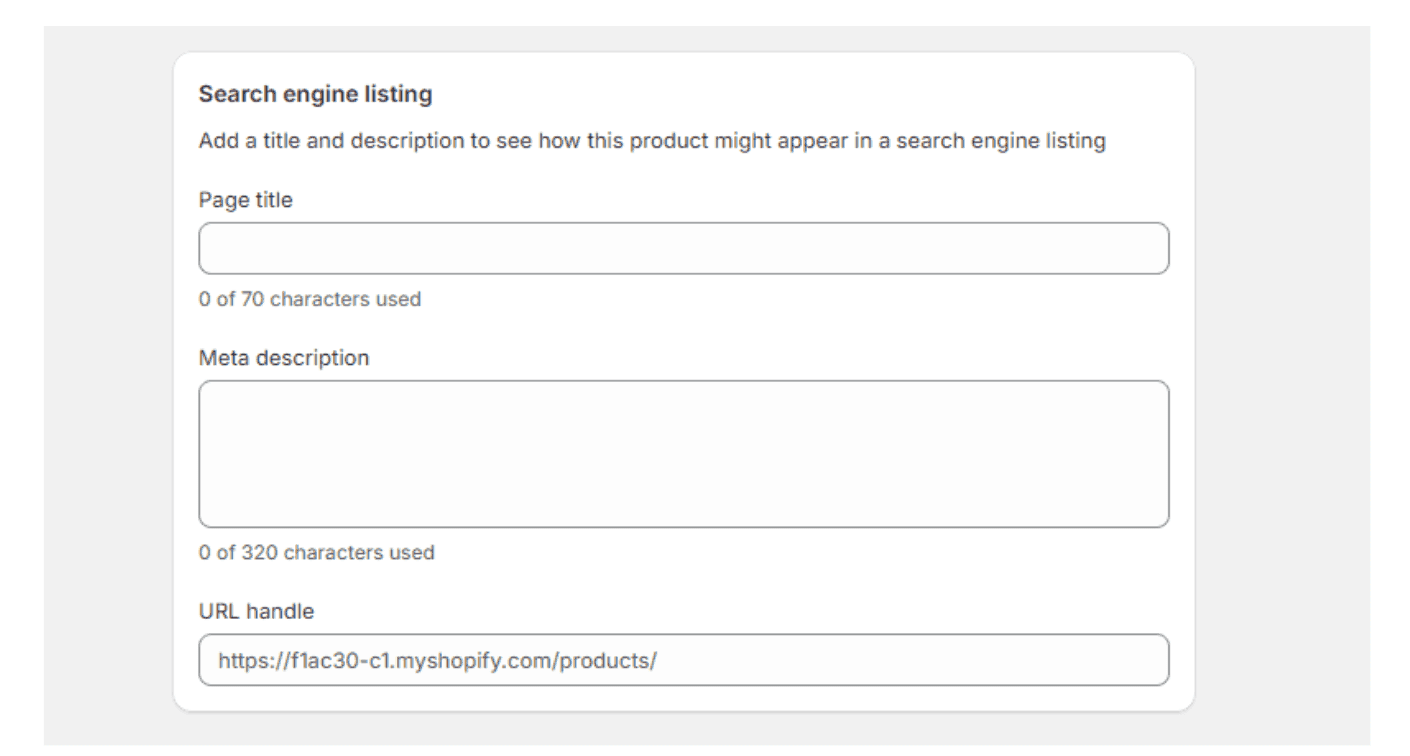
This area is yet another important part of creating new pages for your online store. By including the proper keywords for your products (or keywords that are related to any page that you are creating), you make your pages discoverable on the search engine results page, also known as Google search.
08. Add Collection Pages
After adding multiple products, you want them to be organized on your online store so that customers won’t have a hard time looking for them.
The best way to do that is by sorting them into different collections. Adding a collection page is a process that requires several steps. This video best describes this process:
Just like product pages, applying the best practices of search engine optimization is highly recommended for collection pages to make them searchable from Google.
09. Sort Out Your Website Navigation
Your website navigation plays a crucial role in creating a delightful user experience for your customers. Basically, you want all your pages to be accessible in just two to three clicks from your home page – especially your products.
Google also pays attention to user experience when ranking a website. As such, fixing the navigation within your Shopify store is also a crucial aspect of search engine optimization.
Fortunately, optimizing your website navigation isn’t a difficult process. Watch the video below to learn how to sort out the navigation in your online store:
10. Set Up Shipping
Before you can actually sell physical goods on your online store, you need to have a proper logistics plan in order to deliver products to your customers in a timely manner.
Setting up shipping in Shopify has some complexities to it because it will differ from region to region. Your shipping settings may also differ depending on your business model such as if you are dropshipping or if you are shipping products from your own warehouse.
Here is a video that explains the process of setting up shipping for Shopify stores in the United States:
We also highly recommend reading this official documentation to make sure that you set up your shipping profile properly for your online store: Shopify Help Center | Shipping and delivery
11. Set Up Taxes
Tax laws are different depending on the country. If you are operating your Shopify store in the United States, Shopify will mandate you to get your online store taxation right.
Here is a video explaining how you can set up your Shopify taxes specifically in the United States:

To supplement your learning, read this official Shopify documentation for US taxes: Shopify Tax
12. Connect A Payment Gateway
The final step in setting up a Shopify store is by connecting a payment gateway. Again, the available gateways for your online store could be different depending on where your location is.
This video will explain how to set up a payment gateway:
In setting up a payment gateway, it is important to include the most used methods by your target audience. In the United States, we recommend adding these:
ShopPay
PayPal
Stripe
Amazon Pay
Google Pay
Apple Pay
After setting up a payment gateway, you then need to place a test order to your store to make sure that everything works fine. Luckily, Shopify has a feature that allows you to do so.
Follow the steps in these official Shopify documents:
There you have it! You now have a functioning Shopify store that has products, collection pages, payment gateway, and more. However, there are a lot of things that need polishing
Note: The steps given above are the most basic ones to get your Shopify store up and running. We didn’t explain the design aspect of the store (which usually takes up the most amount of time). Feel free to spend as much time as you need in the design phase of your store to impress your customers when you launch your store.
Check out our step-by-step video guide:

Tips For A Successful Shopify Store
Establishing a successful Shopify store isn’t just all about knowing how to launch it. You should also know what to do after you launch it to attract customers to your business and make their experiences delightful until they decide to purchase from you.
Here are some tips to help you succeed in your e-commerce business
01. Create A Unique Store Branding
Develop a memorable identity for your new Shopify store by creating it with a unique design to set your website apart. The best Shopify app to help you with that is PageFly. PageFly is the leading landing page builder for Shopify that allows users to create memorable website experiences through their easy-to-use editor. No coding is required.
Another way to create a unique store branding is by using a Shopify theme that has all the features that you need and is flexible enough to be molded and shaped into a unique-looking store. For that, we highly recommend the Blum theme because of its affordable pricing and features.
02. Validate Your Products
Before launching an e-commerce business, make sure that there is a demand for the products that you plan to sell. Nowadays, it’s easier to validate a product idea with a simple search on Google Trends or Google Keyword Planner as these tools will help you know whether or not people are searching for a specific solution.
You should also take into account existing competitors in your niche. Evaluate how they price their product to know how to price yours as well. In pricing your products, you should also take into account Shopify transaction fees so they don’t eat up your profits.
03. Focus On Customer Experience
Enhance your online store making user experience your number one priority. Ensure easy navigation and fast loading times to reduce bounce rates. Additionally, prioritize creating responsive customer support to create a seamless shopping experience that encourages repeat business and positive customer feedback.
Moreover, you should reduce friction in all stages of the customer journey such as payment methods and shipping & return policies.
04. Know Your Customers’ Behavior
One way to know if your Shopify store is designed to convert leads into customers is by analyzing their behavior within your website. Fortunately, there are apps like Lucky Orange that allow you to integrate heat maps into your online store to track, analyze, and understand customer behavior.
Understanding how customers interact with your site will help you optimize your website design to increase conversion rates.
05. Make A Solid Marketing Plan
A solid marketing plan is one of the best ways to ensure the sustainability of your Shopify store for the years to come. In developing a marketing plan, incorporate diverse tactics such as social media marketing, email campaigns, and influencer partnerships to reach a wider audience and drive consistent traffic.
You can also leverage your website to promote new arrivals, discounts, and other interesting events in your company to keep customers engaged with your brand.
06. Search Engine Optimization
SEO or search engine optimization plays a crucial role in making your Shopify store visible in the search engine results. As such, this allows you to have consistent organic traffic from time to time instead of just attracting eyeballs from expensive paid ads.
Remember, driving traffic to your website is one of the key things that you need to master in order to ensure your success. This includes learning the best practices of SEO and complementing it with targeted ads to maximize your leads.
Read: How to Drive Traffic to Shopify Store: 9 Proven Strategies
07. Use The Necessary Apps
Launching an online store with Shopify is best accompanied with essential apps to enhance its functionalities. Shopify apps are not just some addition to your monthly bills. Instead, these are instruments to help you reach both your short-term and long-term goals.
Some of the apps that are necessary (regardless of your niche) are as follows:
Customer review apps like Judge.me
Page builders like PageFly
Heatmaps like Lucky Orange
Social media apps like Facebook & Instagram
Email & SMS marketing apps like Klaviyo, and more…
08. Make It Legal
The last tip that we have to ensure that your business runs smoothly without any problems is to make your Shopify store legal. That means complying with all the regulations surrounding your niche to avoid legal issues and build customer trust. It is important to research the national and local laws that govern online businesses in your area.
Setting Up A Shopify Store Is Challenging But Rewarding
Setting up a Shopify store can be a challenging endeavor especially if you don’t have prior experience in handling an online business.
One thing that adds another layer of difficulty is the fact that you have to learn how Shopify works to create and maintain an online store. However, you could always seek professional help to do that for you.
Be that as it may, running an online store with Shopify can be very rewarding because the platform is flexible and capable enough whatever you throw at it. This ensures the long-term sustainability of your online business.
And here’s the thing, most successful Shopify businesses nowadays also started as small teams fueled by the desire to succeed in business. So whatever difficulties that you might encounter, remember that successful online entrepreneurs have also been there. These challenges are all temporary and your journey will only become easier as you learn.
Marketing Strategies to Promote Your Shopify Store
Promoting your Shopify store effectively can transform it from a simple selling platform into a lucrative business venture. Here's how you can make that happen:
1. Harness the Power of Social Media
Engage with potential customers where they spend their time — on social media platforms like Facebook, Instagram, and Twitter. These platforms offer vast opportunities to showcase your products through eye-catching visuals and engaging content. Craft compelling posts that highlight the unique features of your products.
Use Influencers: Collaborate with influencers who align with your brand’s aesthetics. Their endorsement can introduce your products to fresh, enthusiastic audiences.
Boosted Posts and Targeted Ads: Consider investing in paid promotions. Targeted ads allow you to reach a specific audience, increasing the likelihood of reaching individuals who are genuinely interested in your products.
2. Leverage the Impact of Visual Storytelling
Add a professional flair to your product images with high-quality photography. Potential buyers are drawn to visuals that tell a story. Share these images along with engaging captions that emphasize what makes your products a must-have.
3. Explore Guerilla Marketing
For those willing to think outside the box, guerilla marketing offers a chance to create buzz in unique and unexpected ways. The goal is to capture attention in memorable contexts—perhaps via flash mobs or creatively designed public displays, making people stop and take notice.
4. Optimize for Search Engines
Don’t underestimate the power of search engine optimization (SEO). Use relevant keywords in your product descriptions, blog content, and metadata to improve your visibility on search engines. This organic method can increase traffic with potential buyers finding your store when searching for products like yours.
5. Create Engaging Content
Develop a blog or video series that provides value to your audience. Whether it's how-to guides, industry insights, or stories about your brand, captivating content keeps visitors engaged and encourages them to return.
6. Email Marketing
Build an email list to directly reach your customers with personalized offers, updates, and promotions. Email marketing remains one of the most effective strategies for maintaining customer engagement and building loyalty.
Integrating these marketing strategies can significantly enhance your Shopify store's reach and allure, encouraging visitors to become loyal customers.
How to Manage Inventory for a Growing Shopify Store
Managing inventory effectively as your Shopify store expands is crucial for ensuring smooth operations and sustained growth. Here's how you can keep track of your inventory without losing your sanity:
Implement Robust Inventory Management Software
As your business scales, relying on manual methods becomes increasingly difficult. Invest in powerful inventory management software like TradeGecko or QuickBooks Commerce to automate tasks, track stock levels, and manage orders efficiently. These tools help you keep an eye on your inventory in real-time, reducing the risk of stockouts or overstocking.Categorize Your Inventory
Organize your products into categories such as fast-moving, slow-moving, seasonal, and custom orders. This classification helps prioritize stock replenishment and alert you to potential issues with inventory turnover.Set Reorder Points
Determine optimal reorder points for each product. This is the point at which new stock should be ordered to replenish inventory before it runs out. By doing this, you ensure that popular items are always available to meet customer demand.Forecast Demand Accurately
Use historical sales data and market trends to predict future demand. This allows you to make informed decisions about how much stock to order and when to restock. Tools like Forecastly leverage data analytics to improve accuracy in demand forecasting.Regular Inventory Audits
Conduct periodic inventory audits to reconcile physical stock with digital records. Regular checks help identify discrepancies, reduce theft, and improve inventory accuracy.Streamline Supplier Relationships
Build strong relationships with your suppliers. Reliable suppliers who understand your business needs can offer more flexible delivery schedules and better prices, allowing you to maintain optimal stock levels effortlessly.Embrace Multi-location Inventory
If your business operates out of multiple locations, using tools like ShipBob can help manage inventory across different sites. This approach supports faster delivery times and reduces shipping costs.
By incorporating these strategies, you can manage your growing Shopify store's inventory with ease, ensuring you meet customer expectations and thrive in a competitive marketplace.
FAQs
How much does it cost to start a Shopify store?
You can launch a Shopify store for only $1 per month for the first three months of use, regardless of the plan that you use. After three months, you will have to pay for the full monthly subscription prices which are as follows:
Basic Shopify - $39
Shopify - $105
Advanced Shopify - $399
Can you set up a Shopify store for free?
Yes, you can. Shopify offers a 3-day free trial to all new users. That gives you ample time to explore the platform and feel the actual experience. If you decide to start using the platform with a paid plan, you can start for only $1 per month for the first three months of using it.
How to set up a successful Shopify store?
There is no single step in setting up a successful Shopify store. Setting up a successful Shopify store involves a series of systematic steps and knowledge acquisition of various things such as:
Online marketing
Web analytics
Search engine optimization
Paid ads
Website management, and more
Lucky Orange


